2024年12月10日火曜日

Camel Karaf から Camel Spring Boot もしくは Camel Quarkus への移行

 原文: Migrating from Camel Karaf to Camel Spring Boot or Quarkus By Claus lbsen(@davsclaus) Dec 9, 2024

この記事は、Camel 4 への移行支援に関するブログシリーズ第2段です。
第1段の記事は、移行に関する一般原則に注目して書かれています。
今回の記事は、Apache Karaf OSGi Blueprint から Camel 4 への移行に注目しています。


移行作業


Camel Karaf および OSGi Blueprint から Camel 4 への移行は、些細な移行作業ではありません。
移行は、以下の主要な作業から構成されます:
  1. Camel 2.x/3.x から Camel 4.x へのアップグレード
  2. Java 17 か 21 へのアップグレード
  3. Kafka(OSGi) と Spring Boot、Quarkus、Standalone Camel などへの置き換え
  4. あたなの Camel インテグレーションの移行
はじめはこれらの作業量を膨大に感じるかもしれませんが、慌てないでください。


Camel Karaf から Camel 4 への移行


came-karaf ベースの Camel インテグレーションを移行するには、以下の移行が必要です:
  1. Javaコードを、Camel 3.x/3.x から Camel 4.x へ
  2. OSGi Blueprint XML ファイルを、Camel 4 XML/YAML DSL へ 
移行作業を支援する為、camel-jbang にサポート機能を組み込みました。
camel-kafka の例を使い、どのような作業が必要かご紹介します。


最初の例題を移行


最初に、例題 camel-example-sql-blueprint がどういったものか確認します。この例題は、カスタム Java ソースと OSGi blueprint XML に Camel ルートが記述されています。

どれほど状況が悪いか簡単に確認する為、camel-jbang を使い例題を実行し、実行結果を確認します:

cd examples/camel-example-sql-blueprint
camel run pom.xml

camel-jbangpom.xml を使い、既存 Mavenプロジェクトにて Camel がベストエフォートで実行するようなっています。この方法は、Mavenや Camelの実行方法の代替にはなりません。しかし、移行作業においては有用です。

例題を実行した際、何もエラーが出力されず動作することに気がつくでしょう。
何が起きたかというと、camel-jbang が OSGi blueprint XML ファイルを読み込むことができ、<bean><camelContext> を解析し、モダンな Camel 4 上で実行しています。これは、例題の移行作業が最小限であることを意味します。


Blueprint XML ファイルの移行


OSGi Blueprint XML ファイルを、XML か YAML DSL へ移行する必要があります。以下のように camel-jbangtransform コマンドで実施可能です:

camel transform route pom.xml

UI Designer


YAML DSL は、以下のスクリーンショットにある Apache Camel Karavan や Kaoto といった Camel designer で編集可能です。


XML へダンプ


この例題の移行には XMLを使うので、以下のように --format=xml を指定します:

camel transform route pom.xml --format=xml


ダンプをファイルへ書き出す


コンソールへプリントするのではなく、camel transform route コマンドを使いファイルやディレクトリーへ書き出すこともできます。

camel transform route pom.xml --format=xml --output=code

このコマンドで、code ディレクトリー配下に移行されたファイルが出力されます。
camel transform route --help を使い、このコマンドの詳細についてご確認ください。
次の移行作業は、生成されたファイルをご利用予定の runtime (Spring Boot、Quarkus、Camel Main など)へ出力します。

重要: 出力機能は、1回で移行および変換作業をサポートしません。つまり、変換された OSGi Blueprint ファイルを、適切なディレクトリーへ手動でコピーする必要があります。


Spring Boot へのエクスポート


以下のように、Spring Boot へエクスポートできます:

camel export pom.xml --gav=com.mycompany:myproject:1.0 --runtime=spring-boot --dir=code

Quarkus へのエクスポートはこのようになります:

camel export pom.xml --gav=com.mycompany:myproject:1.0 --runtime=quarkus --dir=code


移行の完了


エクスポート機能は Camel Karafベースのプロジェクトをフルサポートしていませんので、エクスポート終了後、プロジェクトを少し掃除する必要があります。

cd code

変換したルート(前回の作業)を、src/main/resources/camel ディレクトリー配下へコピーし、古い OSGi blueprint ファイルを削除する必要があるでしょう。
PS: 変換作業を忘れた場合、変換をやり直して以下のようなフォルダーへ直接出力できます:

cd ..
camel transform route pom.xml --format=xml --output=code/src/main/resources/camel
cd code

また、karaf feature.xml ファイルも削除すべきです。

その他、エクスポート ツールは application.properties で定義されている値のみをサポートするため、sql.properties から値をコピーする必要があります。つまり、値を sql.properties から code/src/main/resources/application.properties にコピーします。

Spring Boot で実行する場合は、 Web サーバーを使用するのがベスト プラクティスであるため、次のように pom.xml に依存関係を追加する必要があります:

<dependency>
  <groupId>org.springframework.boot</groupId>
  <artifactId>spring-boot-starter-web</artifactId>
</dependency>

前述した作業後、プロジェクトをコンパイルし Spring Boot を実行できます:

mvn package spring-boot:run

アプリケーションは Spring Boot 上で実行し、無事に移行できました。

  .   ____          _            __ _ _
 /\\ / ___'_ __ _ _(_)_ __  __ _ \ \ \ \
( ( )\___ | '_ | '_| | '_ \/ _` | \ \ \ \
 \\/  ___)| |_)| | | | | || (_| |  ) ) ) )
  '  |____| .__|_| |_|_| |_\__, | / / / /
 =========|_|==============|___/=/_/_/_/

 :: Spring Boot ::                (v3.4.0)

2024-12-04T08:24:19.113+01:00  INFO 45359 --- [           main] c.mycompany.myproject.CamelApplication   : Starting CamelApplication using Java 17.0.11 with PID 45359 (/Users/davsclaus/workspace/camel-karaf-examples/examples/camel-example-sql-blueprint/code/target/classes started by davsclaus in /Users/davsclaus/workspace/camel-karaf-examples/examples/camel-example-sql-blueprint/code)
2024-12-04T08:24:19.114+01:00  INFO 45359 --- [           main] c.mycompany.myproject.CamelApplication   : No active profile set, falling back to 1 default profile: "default"
2024-12-04T08:24:19.679+01:00  INFO 45359 --- [           main] o.s.b.w.embedded.tomcat.TomcatWebServer  : Tomcat initialized with port 8080 (http)
2024-12-04T08:24:19.685+01:00  INFO 45359 --- [           main] o.apache.catalina.core.StandardService   : Starting service [Tomcat]
2024-12-04T08:24:19.685+01:00  INFO 45359 --- [           main] o.apache.catalina.core.StandardEngine    : Starting Servlet engine: [Apache Tomcat/10.1.33]
2024-12-04T08:24:19.708+01:00  INFO 45359 --- [           main] o.a.c.c.C.[Tomcat].[localhost].[/]       : Initializing Spring embedded WebApplicationContext
2024-12-04T08:24:19.709+01:00  INFO 45359 --- [           main] w.s.c.ServletWebServerApplicationContext : Root WebApplicationContext: initialization completed in 574 ms
2024-12-04T08:24:19.897+01:00  WARN 45359 --- [           main] o.a.c.i.e.DefaultCamelBeanPostProcessor  : No CamelContext defined yet so cannot inject into bean: startupConditionStrategy
2024-12-04T08:24:20.160+01:00  INFO 45359 --- [           main] o.s.b.a.e.web.EndpointLinksResolver      : Exposing 1 endpoint beneath base path '/actuator'
2024-12-04T08:24:20.231+01:00  INFO 45359 --- [           main] o.s.b.w.embedded.tomcat.TomcatWebServer  : Tomcat started on port 8080 (http) with context path '/'
2024-12-04T08:24:20.289+01:00  INFO 45359 --- [           main] o.apache.camel.example.sql.DatabaseBean  : Creating table orders ...
2024-12-04T08:24:20.509+01:00  INFO 45359 --- [           main] o.apache.camel.example.sql.DatabaseBean  : ... created table orders
2024-12-04T08:24:20.613+01:00  INFO 45359 --- [           main] o.a.c.impl.engine.AbstractCamelContext   : Apache Camel 4.9.0 (camel-example-sql-blueprint) is starting
2024-12-04T08:24:20.619+01:00  INFO 45359 --- [           main] o.a.c.impl.engine.AbstractCamelContext   : Routes startup (total:2)
2024-12-04T08:24:20.619+01:00  INFO 45359 --- [           main] o.a.c.impl.engine.AbstractCamelContext   :     Started generateOrder-route (timer://foo)
2024-12-04T08:24:20.619+01:00  INFO 45359 --- [           main] o.a.c.impl.engine.AbstractCamelContext   :     Started processOrder-route (sql://select%20*%20from%20orders%20where%20processed%20=%20false)
2024-12-04T08:24:20.619+01:00  INFO 45359 --- [           main] o.a.c.impl.engine.AbstractCamelContext   : Apache Camel 4.9.0 (camel-example-sql-blueprint) started in 6ms (build:0ms init:0ms start:6ms boot:715ms)
2024-12-04T08:24:20.620+01:00  INFO 45359 --- [           main] c.mycompany.myproject.CamelApplication   : Started CamelApplication in 1.653 seconds (process running for 1.782)
2024-12-04T08:24:21.685+01:00  INFO 45359 --- [2 - timer://foo] generateOrder-route                      : Inserted new order 0
2024-12-04T08:24:22.187+01:00  INFO 45359 --- [sed%20=%20false] processOrder-route                       : Processed order id 0 item 222 of 10 copies of ActiveMQ in Action

それでは、次にもう少し複雑で追加作業が必要な例題を移行します。


より困難な移行


今回は、camel-example-openapi-osgi example を移行します。DSLの修正も必要になります。
まずはこちらを実行しましょう:

cd camel-example-openapi-osgi
camel run pom.xml

実行すると、次のようなエラーが表示されます。

org.apache.camel.xml.io.XmlPullParserLocationException: Unexpected attribute '{}apiContextListing'
in file:src/main/resources/OSGI-INF/blueprint/camel.xml, line 42, column 42:
                       enableCORS="true">
                                        ^

Camel 4 への移行には DSL の変更が必要になる可能性があるため、これは予想されます。この例では、apiContextListing が削除されているため、src/main/resources/OSGI-INF/blueprint/camel.xml ファイル内の行を手動で修正する必要があります:

-                        apiContextPath="api-docs" apiContextListing="true"
+                        apiContextPath="api-docs"

次に、camel run pom.xml を使用して再度実行してみます。
次のエラーは、description に関するものです:

org.apache.camel.xml.io.XmlPullParserLocationException: Unexpected element '{http://www.osgi.org/xmlns/blueprint/v1.0.0}description'
in file:src/main/resources/OSGI-INF/blueprint/camel.xml, line 58, column 20:
      <description>User rest service</description>

<description> は属性に移行する必要があります。したがって、src/main/resources/OSGI-INF/blueprint/camel.xml 内のすべての <description> に対して修正を行う必要があります。この後、再度実行すると、別のエラーが発生します。

org.apache.camel.xml.io.XmlPullParserLocationException: Unexpected attribute '{}uri'
in file:src/main/resources/OSGI-INF/blueprint/camel.xml, line 60, column 99:
            <get uri="/{id}" outType="org.apache.camel.example.rest.User" description="Find user by id">

GET、PUT、POST などのすべての REST 動詞については、次に示すように uri 属性の名前を path に変更する必要があります:

-       <get uri="/{id}" outType="org.apache.camel.example.rest.User" description="Find user by id">
+       <get path="/{id}" outType="org.apache.camel.example.rest.User" description="Find user by id">

もうすぐそこまで来ましたが、最後のエラーが 1 つあります。

org.apache.camel.xml.io.XmlPullParserLocationException: Unexpected element '{http://www.osgi.org/xmlns/blueprint/v1.0.0}route'
in file:src/main/resources/OSGI-INF/blueprint/camel.xml, line 64, column 16:
        <route>

Rest DSL では、インライン化された <route> はサポートされなくなり、これらのインライン化されたルートを別のルートに移動し、direct エンドポイント経由で呼び出す必要があります。

修正前:

<get path="/{id}" outType="org.apache.camel.example.rest.User" description="Find user by id">
    <param name="id" type="path" description="The id of the user to get" dataType="integer"/>
    <responseMessage message="The user that was found"/>
    <responseMessage code="404" message="User not found"/>
    <route>
        <to uri="bean:userService?method=getUser(${header.id})"/>
        <filter>
            <simple>${body} == null</simple>
            <setHeader name="Exchange.HTTP_RESPONSE_CODE">
                <constant>404</constant>
            </setHeader>
        </filter>
    </route>
</get>

修正後:

<get path="/{id}" outType="org.apache.camel.example.rest.User" description="Find user by id">
    <param name="id" type="path" description="The id of the user to get" dataType="integer"/>
    <responseMessage message="The user that was found"/>
    <responseMessage code="404" message="User not found"/>
    <to uri="direct:getUser"/>
</get>

<route>
    <from uri="direct:getUser"/>
    <to uri="bean:userService?method=getUser(${header.id})"/>
    <filter>
        <simple>${body} == null</simple>
        <setHeader name="Exchange.HTTP_RESPONSE_CODE">
            <constant>404</constant>
        </setHeader>
    </filter>
</route>

ついにアプリケーションが  Camel 4 で実行できるようになりました。

$ camel run pom.xml
2024-12-04 08:43:40.809  INFO 45721 --- [           main] org.apache.camel.main.MainSupport        : Apache Camel (JBang) 4.9.0 is starting
2024-12-04 08:43:40.917  INFO 45721 --- [           main] org.apache.camel.main.MainSupport        : Using Java 17.0.11 with PID 45721. Started by davsclaus in /Users/davsclaus/workspace/camel-karaf-examples/examples/camel-example-openapi-osgi
2024-12-04 08:43:43.599  INFO 45721 --- [           main] .main.download.MavenDependencyDownloader : Resolved: org.apache.camel:camel-spring:4.9.0 (took: 2s678ms)
2024-12-04 08:43:47.734  INFO 45721 --- [           main] .main.download.MavenDependencyDownloader : Resolved: org.apache.camel:camel-openapi-java:4.9.0 (took: 2s219ms)
2024-12-04 08:43:47.761  INFO 45721 --- [           main] org.apache.camel.main.BaseMainSupport    : Properties location: file:src/main/resources/log4j2.properties
2024-12-04 08:43:47.794  INFO 45721 --- [           main] org.apache.camel.main.ProfileConfigurer  : The application is starting with profile: dev
2024-12-04 08:43:53.110  INFO 45721 --- [           main] .main.download.MavenDependencyDownloader : Resolved: org.apache.camel:camel-xml-io-dsl:4.9.0 (took: 2s79ms)
2024-12-04 08:43:53.540  INFO 45721 --- [           main] n.xml.blueprint.BlueprintXmlBeansHandler : Discovered 1 OSGi  XML beans
2024-12-04 08:43:53.649  INFO 45721 --- [           main] he.camel.cli.connector.LocalCliConnector : Camel JBang CLI enabled
2024-12-04 08:43:54.710  INFO 45721 --- [           main] e.camel.impl.engine.AbstractCamelContext : Apache Camel 4.9.0 (myCamel) is starting
2024-12-04 08:43:54.982  INFO 45721 --- [           main] org.eclipse.jetty.server.Server          : jetty-12.0.15; built: 2024-11-05T19:44:57.623Z; git: 8281ae9740d4b4225e8166cc476bad237c70213a; jvm 17.0.11+9-LTS
2024-12-04 08:43:55.001  INFO 45721 --- [           main] ipse.jetty.server.handler.ContextHandler : Started oeje10s.ServletContextHandler@10a064bd{ROOT,/,b=null,a=AVAILABLE,h=oeje10s.ServletHandler@2de7fe0e{STARTED}}
2024-12-04 08:43:55.003  INFO 45721 --- [           main] jetty.ee10.servlet.ServletContextHandler : Started oeje10s.ServletContextHandler@10a064bd{ROOT,/,b=null,a=AVAILABLE,h=oeje10s.ServletHandler@2de7fe0e{STARTED}}
2024-12-04 08:43:55.010  INFO 45721 --- [           main] g.eclipse.jetty.server.AbstractConnector : Started ServerConnector@26f11b40{HTTP/1.1, (http/1.1)}{0.0.0.0:8080}
2024-12-04 08:43:55.011  INFO 45721 --- [           main] org.eclipse.jetty.server.Server          : Started oejs.Server@3883b5e9{STARTING}[12.0.15,sto=0] @15508ms
2024-12-04 08:43:55.092  INFO 45721 --- [           main] e.camel.impl.engine.AbstractCamelContext : Routes startup (total:3 rest-dsl:2)
2024-12-04 08:43:55.092  INFO 45721 --- [           main] e.camel.impl.engine.AbstractCamelContext :     Started route2 (direct://getUser)
2024-12-04 08:43:55.092  INFO 45721 --- [           main] e.camel.impl.engine.AbstractCamelContext :     Started route1 (rest-api://api-docs)
2024-12-04 08:43:55.092  INFO 45721 --- [           main] e.camel.impl.engine.AbstractCamelContext :     Started route3 (rest://get:/echo:/ping)
2024-12-04 08:43:55.092  INFO 45721 --- [           main] e.camel.impl.engine.AbstractCamelContext : Apache Camel 4.9.0 (myCamel) started in 381ms (build:0ms init:0ms start:381ms boot:13s900ms)


Camel Quarkus への移行


この例題では、Spring Boot ではなく Camel Quarkus に移行します。

camel export pom.xml --gav=com.mycompany:myproject:1.0 --runtime=quarkus --dir=code

異なるエラーが出力されます:

Generating fresh run data
Running using Quarkus v3.17.2 (preparing and downloading files)
org.apache.camel.FailedToStartRouteException: Failed to start route route3 because of Component jetty is not a RestConsumerFactory

これは、古い Karaf の例が、Rest DSL サービスをホストするための HTTP サーバーとして Jetty を使用しているからです。これを削除し、Quarkus (または Spring Boot) に付属するデフォルトの platform-http を Camel で使用できるようにする必要があります。

したがって、次のように XML ファイルを修正します:

<restConfiguration bindingMode="json"
                   contextPath="rest" port="8080"
                   apiContextPath="api-docs"
                   enableCORS="true"
                   inlineRoutes="false">

重要: Rest DSL を使用する場合、Camel JBang がルートを変換できるようにルートを分離する必要があるため、inlineRoutes="false" を設定する必要があります。この問題は、Camel 4.10 以降では自動的に修正される可能性があります。

export を再度実行します。
次に、Blueprint XML ファイルを移行し、以下のように src/main/resources/camel ディレクトリーへ直接出力します:

camel transform route pom.xml --format=xml --output=code/src/main/resources/camel

次に、Camel 4 on Quarkus へ完全に移行するため、プロジェクトを掃除する必要があります。
pom.xml で、camel-jettyCamel-spring の依存関係を削除します。
また、src/main/resources/camel.xml ファイルに <restConfiguration> を追加する必要があります。これらは、camel transform route コマンドに自動で含まれないためです。
よって、ファイル先頭の <camel> ルート タグ配下に、これを追加します:

<restConfiguration bindingMode="json"
                   contextPath="rest" port="8080"
                   apiContextPath="api-docs"
                   enableCORS="true"
                   inlineRoutes="false">

    <!-- we want json output in pretty mode -->
    <dataFormatProperty key="prettyPrint" value="true"/>

    <!-- setup openapi api descriptions -->
    <apiProperty key="base.path" value="rest"/>
    <apiProperty key="api.version" value="1.2.3"/>
    <apiProperty key="api.title" value="User Services"/>
    <apiProperty key="api.description" value="Camel Rest Example with OpenApi that provides an User REST service"/>
    <apiProperty key="api.contact.name" value="The Apache Camel team"/>

</restConfiguration>

この作業後、次のように移行したサンプルをコンパイルし、 Camel Quarkus で実行できるようになります:

$ mvn package quarkus:run
__  ____  __  _____   ___  __ ____  ______
 --/ __ \/ / / / _ | / _ \/ //_/ / / / __/
 -/ /_/ / /_/ / __ |/ , _/ ,< / /_/ /\ \
--\___\_\____/_/ |_/_/|_/_/|_|\____/___/
2024-12-04 11:09:03,974 INFO  [org.apa.cam.qua.cor.CamelBootstrapRecorder] (main) Apache Camel Quarkus 3.16.0 is starting
2024-12-04 11:09:03,979 INFO  [org.apa.cam.mai.MainSupport] (main) Apache Camel (Main) 4.8.1 is starting
2024-12-04 11:09:04,066 INFO  [org.apa.cam.mai.BaseMainSupport] (main) Auto-configuration summary
2024-12-04 11:09:04,066 INFO  [org.apa.cam.mai.BaseMainSupport] (main)     [MicroProfilePropertiesSource] camel.main.routesIncludePattern = camel/camel.xml
2024-12-04 11:09:04,066 INFO  [org.apa.cam.mai.BaseMainSupport] (main)     [MicroProfilePropertiesSource] camel.main.name = camel-example-openapi-osgi
2024-12-04 11:09:04,158 INFO  [org.apa.cam.imp.eng.AbstractCamelContext] (main) Apache Camel 4.8.1 (camel-example-openapi-osgi) is starting
2024-12-04 11:09:04,463 INFO  [org.apa.cam.imp.eng.AbstractCamelContext] (main) Routes startup (total:5 rest-dsl:4)
2024-12-04 11:09:04,463 INFO  [org.apa.cam.imp.eng.AbstractCamelContext] (main)     Started route2 (direct://getUser)
2024-12-04 11:09:04,463 INFO  [org.apa.cam.imp.eng.AbstractCamelContext] (main)     Started route1 (rest-api://api-docs)
2024-12-04 11:09:04,464 INFO  [org.apa.cam.imp.eng.AbstractCamelContext] (main)     Started route3 (rest://get:/user:/%7Bid%7D)
2024-12-04 11:09:04,464 INFO  [org.apa.cam.imp.eng.AbstractCamelContext] (main)     Started route4 (rest://put:/user)
2024-12-04 11:09:04,464 INFO  [org.apa.cam.imp.eng.AbstractCamelContext] (main)     Started route5 (rest://get:/user:/findAll)
2024-12-04 11:09:04,465 INFO  [org.apa.cam.imp.eng.AbstractCamelContext] (main) Apache Camel 4.8.1 (camel-example-openapi-osgi) started in 305ms (build:0ms init:0ms start:305ms)
2024-12-04 11:09:04,567 INFO  [io.quarkus] (main) myproject 1.0 on JVM (powered by Quarkus 3.17.2) started in 0.989s. Listening on: http://0.0.0.0:8080
2024-12-04 11:09:04,567 INFO  [io.quarkus] (main) Profile prod activated.
2024-12-04 11:09:04,568 INFO  [io.quarkus] (main) Installed features: [camel-attachments, camel-bean, camel-core, camel-direct, camel-jackson, camel-microprofile-health, camel-openapi-java, camel-platform-http, camel-rest, camel-xml-io-dsl, cdi, smallrye-context-propagation, smallrye-health, vertx]

そして、次のような Rest サービスを呼び出すことができるはずです:

curl http://0.0.0.0:8080/rest/user/123
{
  "id" : 123,
  "name" : "John Doe"
}

ふー、これは少し大変でした。


まとめ


Camel JBang ツールは、OSGi Blueprint XML ファイルを最新の Camel へ移行するのに役立つツールです。特殊な OSGi 機能を使用するより複雑な OSGi アプリケーションを構築している場合は、手動で移行する必要があります。

Camel 4 では、従来の Apache Karaf よりもはるかに大きなコミュニティとユーザー ベースを持つ Spring Boot または Quarkus の最新スタック上で動作するので、将来のアップグレードは、はるかに簡単になります。

Rest DSL から YAML DSL への変換はまだサポートされていないことに注意してください。たとえば、Rest を使用して移行した最後の例では、YAML DSL の REST 要素を自動生成することはできません。これは将来的に実装される予定です。

詳細については、Camel 3.x/4.x の移行およびアップグレード ガイドを参照してください。移行に関するほとんどの問題は、ガイド (上記) に記載されています。

Camel JBang ツールは、このブログ投稿に示されているように、既存プロジェクトの移行をすぐ試すのに役立ちます。

移行ツールに関するフィードバックは大歓迎です。頑張ってください。モダンな Camel 4 の世界で会いましょう。

2024年4月23日火曜日

Red Hat Buld of Apache Camel 4 向け開発ツール(VSCode Extension Pack for Apache Camel by Red Hat)

Red Hat Fuse 6.x の頃から開発ツールと言えば、 Eclipse plugin向けに提供されていた fuse tooling  時代が長く続きました。GUI camel ルート エディターを使い、blueprint.xmlを作成された方も多いかと思います。


時代は流れ、アップストリームの Apache Camel もメジャーバージョンが 2.x から 3.x -> 4.x とアップデートされ、Camel 2.x を内部で使用する Red Hat Fuse 7.x も 2024年6月30日をもって End of Life となります。  Red Hat Fuse 用開発ツールとして提供された fuse tooling のサポートも終了しております。今後は、Red Hat Build of Apache Camel 4.x が後継製品としてサポートされます。

今回の記事では、今後主力製品としてサポートされる Red Hat Build of Apache Camel 4.x 向け開発ツールをご紹介します。ツールの概要と簡単な使い方、最後にフィードバック方法について順に記載します。

まずはツール名について。オフィシャルドキュメントにも記載がありますが、VSCode Extension Pack を使った開発を推奨しております。名前は「Extension Pack for Apache Camel by Red Hat」です。

(camel コミュニティーではコーディングの入力補完が可能な IntelliJ IDEA向け camel plugin が提供されていますが、製品としてご案内しておりません。)

「Extension Pack for Apache Camel by Red Hat」には、Camel for Spring Boot、Camel for Quarkus、Camel-K の開発を補助する複数ツールが同梱されています。

その中でも、Camel に特化した注目すべきツールは2つ。

JBang を使った camel ベースの開発は以前、赤帽ブログでも紹介されました。camel-jbang は、JBangをベースに camelの動作確認やデバッグなどをスクリプト感覚で体験できる CLIツールです。積極的に開発が進んでおり、camel ルート の実行/管理/デバッグや camel ライブラリーのバージョン指定、maven projectの生成などなど、豊富な機能が提供されています。
製品ドキュメントでは、「camel CLI」として機能紹介がされています。

この使い勝手の良いコマンドラインツールと並び積極的に開発が進んでいるのが、 GUI camel ルート エディターの kaoto です。
現時点(2024年4月)では Technology Preview の扱いですが、GUI camel ルート エディターの本命として注目されています。

GUI camel ルート エディターがどういった使われ方をしているか、以前社内営業/SA/コンサルタント/TAM/サポートチーム から現場の声をヒアリングしまとめた事があります。
国内ユーザーで圧倒的に評価されていたのが、camel ルートの画像出力機能です。システム設計資料に camel ルートの画像を使う事で、直感的にわかりやすい資料が効率的に作成できるとのことです。kaoto の正式サポート開始を待ちわびる声も多く、一足先にこのブログでご案内することにしました。
それでは、早速使ってみましょう。

インストール方法

まずは、 camel-jbang のインストールです。Jbang をインストールした後に jbang コマンドで camel CLI app をインストールする流れです。こちらの詳細手順に沿ってご対応ください。(数分もかからない作業です。)
VSCode 環境が無い方は、こちらから入手可能です。
「Extension Pack for Apache Camel by Red Hat」のインストールは、こちらの手順に沿ってご対応ください。Java 17 以上が必要になりますので、ご留意ください。

Hello Worldの作成

それでは、実験用にディレクトリーを用意します。vs code terminal もしくは OS terminal で sample ディレクトリーを作成します。

]$ mkdir sample
]$ cd sample/

camel-jbang により、サンプル camel ルートを自動生成します。

sample]$ camel init hello.yaml
sample]$ cat hello.yaml 
# camel-k: language=yaml

# Write your routes here, for example:
- from:
    uri: "timer:yaml"
    parameters:
      period: "1000"
    steps:
      - setBody:
          simple: "Hello Camel from ${routeId}"
      - log: "${body}"

camel init コマンドは、拡張子(java/xml/yaml)を識別してそれぞれの camel DSL でサンプル camel ルートを生成します。 例えば、camel init camel.java と実行すると、Java DSL を使った camel ルートが自動生成されます。
現時点で kaoto は yaml DSL にのみ対応していますので、今回は hello.yaml を生成しました。

話が脱線しますが、もし既存の資産を kaoto で表示されたい場合、camel transfrom コマンドで yaml DSL へ自動変換可能です。

sample]$ camel init demo.java
sample]$ cat demo.java
// camel-k: language=java

import org.apache.camel.builder.RouteBuilder;

public class demo extends RouteBuilder {

    @Override
    public void configure() throws Exception {

        // Write your routes here, for example:
        from("timer:java?period={{time:1000}}")
            .setBody()
                .simple("Hello Camel from ${routeId}")
            .log("${body}");
    }
}
sample]$ camel transform route --format=yaml ./demo.java > demo.yaml
sample]$ cat demo.yaml 
- route:
    from:
      uri: "timer:java?period={{time:1000}}"
      steps:
        - setBody:
            simple:
              expression: "Hello Camel from ${routeId}"
        - log:
            message: "${body}"

kaoto 上で変換できる機能をリクエストしていますが、当面は  camel CLIにてご対応ください。

それでは、camelコマンドで生成した hello.yaml をkaotoで開きます。
VScode の Fileメニューから、"Open Folder" をクリックし、先ほど作成した sample ディレクトリーを開きます。Exploer に hello.yaml が表示されていますので、
右クリック -> Open With Kaoto Graphical Editor for Camel を選択します。画面に GUIエディターが表示されましたでしょうか。


拡張子が、 *.camel.yaml の場合、ファイルのクリックで GUI camel  ルートエディターが自動で使われます。
*.yaml の場合、テキストエディターがデフォルトで使われます。
普段どのエディターを頻繁に使われるかにより、拡張子を camel.yaml にするか、.yaml にするかご判断いただければと思います。
また、バグが報告されており、執筆時は直接ファイルをオープンした場合、camel-jbang の挙動が不安定になります。一旦、ディレクトリーを開いてからファイルを選択してください。

fuse tooling と同様、camel component アイコンをクリックすると設定編集画面が表示されますので、直感的にコーディングができます。


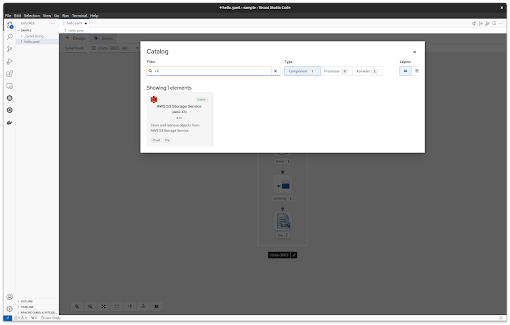
ルート画像下にあるアイコンを使い、ルートの縦表示/横表示を選んだり、ズームイン/アウトなどコントロール可能です。一番右の 「Open Catalog」は、camel component のカタログが表示されます。キーワードによるフィルタリングもあり、fuse tooling より閲覧性が大幅に向上しています。


camel ルートへコンポーネントを追加する場合、既存のコンポーネントのドット柄をクリックし、「Append」を選択します。 camel componentカタログが表示されるので、追加コンポーネントをクリックするとルートに追加されます。


もちろん、画面上のメニューから、camel ルートの画像出力が可能です。


Technology Preview ですので、使っていると細かいバグや不足している機能があるかと思います。ぜひ、kaotoコミュニティーや、弊社を通してフィードバックをお願いします。(具体的な方法はこのブログの最後にご案内します。)


Hello World の実行

hello.yaml が開いている状況で、画面右上にある "Run Camel Application with JBang" をクリックしてください。


VSCode Terminalで camel routeが実行されるはずです。


fuse tooling を使っていたユーザーには、「Run As  Local CamelContext」が馴染み深いかと思いますが、Quarkus や SpringBoot を使わず、camel-jbang を使い camel ルートの動作確認を簡単に試したい状況に有用です。

GUIメニューから camel ルートを実行しましたが、ターミナルで camel run コマンドを実行しても同様の結果が得られます。camel run コマンドには豊富なオプションが用意されています。例えば、--camel-version オプションで camelライブラリーのバージョンを指定可能です。実際にご利用予定のバージョンや、マイグレーション作業の際にアップデート後のバージョンを指定する事で、簡単な動作検証が可能です。

sample]$ camel run --camel-version=4.0.0 hello.yaml 
[jbang] Resolving dependencies...
[jbang]    org.apache.camel:camel-bom:4.0.0@pom
[jbang]    org.apache.camel:camel-jbang-core:4.0.0
[jbang]    org.apache.camel.kamelets:camel-kamelets:4.5.0
[jbang] Dependencies resolved
2024-04-23 10:48:47.468  INFO 41831 --- [           main] org.apache.camel.main.MainSupport   : Apache Camel (JBang) 4.0.0 is starting
2024-04-23 10:48:47.662  INFO 41831 --- [           main] org.apache.camel.main.MainSupport   : Using Java 17.0.9 with PID 41831. Started by hfuruich in /home/hfuruich/sample
2024-04-23 10:48:50.043  INFO 41831 --- [           main] .download.MavenDependencyDownloader : Downloaded: org.apache.camel:camel-rest:4.0.0 (took: 2s93ms) from: central@https://repo1.maven.org/maven2
2024-04-23 10:48:50.197  INFO 41831 --- [           main] mel.cli.connector.LocalCliConnector : Camel CLI enabled (local)
2024-04-23 10:48:50.303  INFO 41831 --- [           main] el.impl.engine.AbstractCamelContext : Apache Camel 4.0.0 (hello) is starting
2024-04-23 10:48:50.471  INFO 41831 --- [           main] el.impl.engine.AbstractCamelContext : Routes startup (started:1)
2024-04-23 10:48:50.471  INFO 41831 --- [           main] el.impl.engine.AbstractCamelContext :     Started route-3663 (timer://yaml)
2024-04-23 10:48:50.471  INFO 41831 --- [           main] el.impl.engine.AbstractCamelContext : Apache Camel 4.0.0 (hello) started in 167ms (build:0ms init:0ms start:167ms)
2024-04-23 10:48:51.486  INFO 41831 --- [ - timer://yaml] hello.yaml:10                       : Hello Camel from route-3663
2024-04-23 10:48:52.455  INFO 41831 --- [ - timer://yaml] hello.yaml:10                       : Hello Camel from route-3663
2024-04-23 10:48:53.455  INFO 41831 --- [ - timer://yaml] hello.yaml:10                       : Hello Camel from route-3663

Hello World の Debug

fuse tooling で提供されていた camel ルートレイヤーのデバッグ機能は、VSCodeでもご利用いただけます。
hello.yaml をテキストエディーター開き、任意の行番号をクリックすることでブレイクポイントをセットします。


画面右上にあるメニュー 「Run Camel Application with JBang and Debug」をクリックすると、先ほどと同様に camel route の実行が始まりますが、すぐに停止し、デバッグ情報が出力されます。

その他

camel-jbang には豊富な機能があります。例えば、今回作成した hello.yaml を実行する Quarkus アプリケーション用 maven プロジェクトを自動生成できます。
sample]$ camel export --runtime=quarkus --gav=com.foo:acme:1.0-SNAPSHOT
Generating fresh run data
Exporting as Quarkus project to: .
sample]$ tree
.
├── hello.yaml
├── mvnw
├── mvnw.cmd
├── pom.xml
└── src
    └── main
        ├── docker
        │   ├── Dockerfile.jvm
        │   ├── Dockerfile.legacy-jar
        │   ├── Dockerfile.native
        │   └── Dockerfile.native-micro
        ├── java
        │   └── com
        │       └── foo
        │           └── acme
        └── resources
            ├── application.properties
            ├── camel
            │   └── hello.yaml
            └── kamelets
sample]$ mvn clean package
sample]$ java -jar target/quarkus-app/quarkus-run.jar 
__  ____  __  _____   ___  __ ____  ______ 
 --/ __ \/ / / / _ | / _ \/ //_/ / / / __/ 
 -/ /_/ / /_/ / __ |/ , _/ ,< / /_/ /\ \   
--\___\_\____/_/ |_/_/|_/_/|_|\____/___/   
2024-04-23 11:55:27,494 INFO  [org.apa.cam.qua.cor.CamelBootstrapRecorder] (main) Bootstrap runtime: org.apache.camel.quarkus.main.CamelMainRuntime
2024-04-23 11:55:27,499 INFO  [org.apa.cam.mai.MainSupport] (main) Apache Camel (Main) 4.4.0 is starting
2024-04-23 11:55:27,564 INFO  [org.apa.cam.mai.BaseMainSupport] (main) Auto-configuration summary
2024-04-23 11:55:27,564 INFO  [org.apa.cam.mai.BaseMainSupport] (main)     [MicroProfilePropertiesSource] camel.main.routesIncludePattern=camel/hello.yaml
2024-04-23 11:55:27,647 INFO  [org.apa.cam.imp.eng.AbstractCamelContext] (main) Apache Camel 4.4.0 (camel-1) is starting
2024-04-23 11:55:27,655 INFO  [org.apa.cam.imp.eng.AbstractCamelContext] (main) Routes startup (started:1)
2024-04-23 11:55:27,656 INFO  [org.apa.cam.imp.eng.AbstractCamelContext] (main)     Started route-3663 (timer://yaml)
2024-04-23 11:55:27,656 INFO  [org.apa.cam.imp.eng.AbstractCamelContext] (main) Apache Camel 4.4.0 (camel-1) started in 8ms (build:0ms init:0ms start:8ms)
2024-04-23 11:55:27,744 INFO  [io.quarkus] (main) acme 1.0-SNAPSHOT on JVM (powered by Quarkus 3.8.2) started in 0.831s. Listening on: http://0.0.0.0:8080
2024-04-23 11:55:27,744 INFO  [io.quarkus] (main) Profile prod activated. 
2024-04-23 11:55:27,744 INFO  [io.quarkus] (main) Installed features: [camel-attachments, camel-core, camel-microprofile-health, camel-platform-http, cdi, smallrye-context-propagation, smallrye-health, vertx]
2024-04-23 11:55:28,669 INFO  [hel.yaml:10] (Camel (camel-1) thread #1 - timer://yaml) Hello Camel from route-3663
2024-04-23 11:55:29,656 INFO  [hel.yaml:10] (Camel (camel-1) thread #1 - timer://yaml) Hello Camel from route-3663

活発に開発が進んでいる camel-jbang の最新機能については、コミュニティードキュメントをご確認ください。
また、VSCode 上で F1キーをエンターし、表示された入力フィールドに camel と入力してください。実行可能なコマンドの一覧が表示されますので、コマンドを覚える必要がありません。


kaoto にはチュートリアルが用意されておりますので、そちらも合わせてご活用ください。

フィードバックについて

最後にご協力のお願いです。
実際に使われるユーザーのフィードバックがあることで、コミュニティーはより活性化します。ぜひ、動作不具合や機能リクエストについて、コミュニティーへインプットしていただくようご検討ください。特に kaoto は technology preview 中であり、広くユーザー皆さんの声を求めています。 
直接チケットを通してレポートしていただく事も可能です。
こちらでディスカッションしていただく事も可能です。
https://github.com/orgs/KaotoIO/discussions

Red Hat Fuse/Red Hat Integration/Red Hat Application Foundation 用サブスクリプションをご購入されたお客様は、サポートケースを通してコメントしていただくことも可能です。
例えば、
  • このバグをレポートして欲しい
  • この機能を追加検討して欲しい
  • 既存のバグチケットを実現するよう後押しして欲しい
といった内容を歓迎しております。
例えば、Technology Preview期間中、こんなチケットが作成され、検討が進められています。
"Create a menu to generate a document about camel route"
その他、グローバルで後押しのある機能として、GUIのデータマッピング機能があります。
https://issues.redhat.com/browse/KTO-433

ぜひ気になる点や応援したいチケットなどあれば、サポートケースなどを通してコミュニティーへ皆さんの声を届けていただければ幸いです。
今後ともよろしくお願い致します。

2019年7月2日火曜日

クラウドネイティブなアプリケーション環境向けアーキテクチャー

原文: Introduction to cloud-native application environment architecture By Christina Lin July 2, 2019


クラウドネイティブ環境のアーキテクチャーを理解するのはとても大変だったりします。アプリケーション開発者や ソフトウェア/システムアーキテクトの理解を助ける為、これからクラウドネイティブ環境のアーキテクチャーを構成する個々の要素とそれらがどのように連携するかについて説明します。
より理解しやすくするには、アーキテクチャーを4階層に分けて考えるのが有効である事に気がつきました。4階層は、「アプリケーションソフトウェア開発」、「サービスのスケール」、「アプリケーションネットワーク」、「コンテナオーケストレーションプラットフォーム」から構成されます。

この記事では、最初の階層である「アプリケーションソフトウェア開発」について説明します。4階層の概念を視覚化しやすくする為、下記の図を描きました。


コンテナネイティブまたはクラウドネイティブなアプリケーション開発は一般的なグリーン・フィールドシステムと呼ばれ、アプリケーションはマイクロサービスに分割されます。各マイクロサービスの傾向として独自のデータソースがあり、他のマイクロサービスから独立しており、分散して配置されます。

このような実装の利点は、アプリケーションをよりアジャイルかつポリグロットにし、問題を切り分け、コードベースを小さくし、保守を容易にできることです。仮にこのような実装を選択することで今すぐあなたの人生が良くなると伝えたならば、私のメッセージはウソになります。

アジャイルで真にスケーラブルで自動化されたコンテナ/クラウドネイティブシステムのメリットを実現するには、アプリケーション、プラットフォーム、ペルソナといった要素を考慮する必要があります。以下の要素も含まれます:
  • シナリオに適したテクノロジを使用する
    • 複雑な解決策は過剰である場合があります
    • 間違った解決策を間違った場所で使用すると、責務を見失う可能性があります
  • 継続的インテグレーションをあわせたドメイン駆動設計
    • 非同期のイベントか API
    • 既存のブラウンフィールドアプリケーションといかにインテグレートするか
上の図は、コンテナ/クラウドネイティブ システムのさまざまな構成要素がどのように連携して機能するかの大まかな概要を示します。また、特定のテクノロジをいつ導入するか、または導入するかどうかを決めるのにも役立てばと願います。

アプリケーションソフトウェア開発レイヤー

アプリケーションソフトウェア開発レイヤーは、システムに適用されるソフトウェアパターンに関するレイヤーです。ドメインのモデリング、マイクロサービスの定義方法、デプロイ方法、疎結合で継続的に改善するシステムの開発に役立ちます。また、通信技術とアプリケーション間のパターンも含まれます。

サービス スケール - Knative

アプリケーションが使用されていないときにゼロへスケールインできると、リソースの最適化が可能になります。 このレイヤーは、クラウドコンピューティングの特性を最大限に活用しますが、すべてのサービスが必要とするわけではありません。

アプリケーションネットワーク - Service mesh

これは、分散マイクロサービス環境でとても一般的なアーキテクチャ機能です。 このレイヤーを使用すると、マイクロサービス間の通信をより良く、より均一に制御でき、観測性も向上します。 DevOps はこのレイヤーを使用して、一般的なセキュリティ、障害回復、ロールアウトポリシーなどを適用したり、カスタマイズされたポリシーを設定したりできます。 このレイヤーは、開発者の多くの冗長な作業を取り除きます。

コンテナ オーケストレーション プラットフォーム レイヤー - Red Hat OpenShift

クラウドネイティブ環境におけるアーキテクチャの基盤です。 コンテナオーケストレーション、サービスディスカバリ、CI/CD自動化、ロギングなどの基本的かつ不可欠な機能を提供します。

ドメイン駆動設計 と アジャイル インテグレーション 

ドメイン駆動設計(domain-driven design: DDD)の原則は、ビジネスユーザーと開発者間のコミュニケーションを改善し、ドメインに従ってオブジェクトをモデル化し、境界を設定して複雑なビジネス要件をセグメント化することにより、クラウドネイティブの世界でアプリケーションを開発する方法に適用されます。 DDDの重要な側面は、継続的インテグレーションです。

アジャイル インテグレーションは、マイクロサービスとDDDの基本概念から発展しました。 ビジネスロジックのモデリングをのぞくソフトウェア開発では、他の多くの要素も考慮する必要があります。 DDDをベースとしたアジャイル インテグレーションにより、モデルと境界だけでなく、異なる機能に関する懸念に基きそれらをどのように分離すべきか、およびそれらを物理的にデプロイする方法を定義するのに役立ちます。 アジャイル インテグレーションには3つの主な責任があります。
  • コア - ビジネスロジックまたはドメイン機能を実装するマイクロサービスの大部分は、このカテゴリに属します。 これらは、実行形態およびサービス間の連携方法の両方で軽量であり、典型的に小さくシンプルなマイクロサービスの良い例です
  • コンポジット - ここでは、サービスの適切な粒度の設定、トランザクションの処理、さまざまな種類のイベントに対するオーケストレーション、データ変換がすべて処理されます。 このカテゴリでは、データとイベントの集約と分離が行われます。 これは、あるポイントから別のポイントにイベントを適切な形式で伝搬するシンプルでステートレスなパイプとして機能し、場合によっては外部のSaaS、ブラウンフィールドアプリケーション、または境界コンテキスト外のサービスへのゲートウェイである必要があります
  • コントロール と ディスパッチ - システムが少数の外部システムとのみ連携する場合、このカテゴリは不要かもしれません。このカテゴリを使用すると、システムが提供するサービスについて、より多くの洞察と意味のあるビジネスコントロールが可能になります。これは、迅速でアドホックな変更を必要とする外部クライアントのリクエストから、常に面倒なカスタマイズを隠すカテゴリです。 ファサードパターンはこのカテゴリに適用されます
上記の原則を適用すると、次のことが可能になります:
  • ビジネス要件からモデルとエンティティを抽出します
  • ビジネスドメイン間の境界を設定します
  • コードの性質を分類し、独立した個別のデプロイ可能なマイクロサービスインスタンスに分けます
別の重要で基本的な問題は、これらのマイクロサービス間の通信です。 これらのマイクロサービスの通信バックボーンには、主にイベント駆動型かつ非同期である必要があるはずです。データの配信を疎結合にでき、システムはリアクティブになります。 欠点は、このタイプの設計ではトランザクションがかなり複雑になる可能性があることですが、これはイベントソーシングなどの手法を実装することで克服できます。 境界または外部クライアント/パートナー間の通信には、以下の理由で APIを使用することを強くお勧めします:
  • プロセスのほとんどはリクエスト/レスポンス形式を使用しており、 REST APIの生来の基本動作と合致します
  • コントラクトの定義とリポジトリを管理する為の技術は、API分野でより成熟しています
次回は、イベント内に存在するさまざまなタイプのデータとその処理方法、およびクラウドネイティブなアプリケーション環境でデータの一貫性を実現する方法について説明します。 また、今回紹介していない他のレイヤー(サービススケーリング、アプリケーションネットワーク、コンテナーオーケストレーションプラットフォーム)についても説明します。

原文: Introduction to cloud-native application environment architecture By Christina Lin July 2, 2019

2019年6月25日火曜日

Apache Camel 3 - camel-core vs camel-core-engine (小さくなった core)

原文: Apache Camel 3 - camel-core vs camel-core-engine (smaller core) By Claus lbsen(@davsclaus) June 25, 2019

Camelチームは、現在 Apache Camel 3 のリリースに向け多忙です。すでに多くのタスクが実装済みであり、これまでに 3つの マイルストーン リリースを公開しました。次のマイルストーンのリリース番号 4 には、革新的な新機能が同梱されます。今後数カ月にわたり、この素晴らしい新機能についてブログで紹介していきます。

このブログでは、camel-core をより小さなモジュールに分割した作業について紹介します。小さなモジュールに分割されたことで、必要なものだけを簡単に選択できるようになりました。

camel-core の JAR 依存関係ツリーを見ると、以下のように多くのモジュールに分割されていることがわかります。

[INFO] +- org.apache.camel:camel-core:jar:3.0.0-SNAPSHOT:compile
[INFO] |  +- org.apache.camel:camel-api:jar:3.0.0-SNAPSHOT:compile
[INFO] |  +- org.apache.camel:camel-base:jar:3.0.0-SNAPSHOT:compile
[INFO] |  +- org.apache.camel:camel-jaxp:jar:3.0.0-SNAPSHOT:compile
[INFO] |  +- org.apache.camel:camel-management-api:jar:3.0.0-SNAPSHOT:compile
[INFO] |  +- org.apache.camel:camel-support:jar:3.0.0-SNAPSHOT:compile
[INFO] |  +- org.apache.camel:camel-util:jar:3.0.0-SNAPSHOT:compile
[INFO] |  +- org.apache.camel:camel-util-json:jar:3.0.0-SNAPSHOT:compile
[INFO] |  +- org.apache.camel:camel-bean:jar:3.0.0-SNAPSHOT:compile
[INFO] |  +- org.apache.camel:camel-browse:jar:3.0.0-SNAPSHOT:compile
[INFO] |  +- org.apache.camel:camel-caffeine-lrucache:jar:3.0.0-SNAPSHOT:compile
[INFO] |  |  \- com.github.ben-manes.caffeine:caffeine:jar:2.7.0:compile
[INFO] |  |     +- org.checkerframework:checker-qual:jar:2.6.0:compile
[INFO] |  |     \- com.google.errorprone:error_prone_annotations:jar:2.3.3:compile
[INFO] |  +- org.apache.camel:camel-controlbus:jar:3.0.0-SNAPSHOT:compile
[INFO] |  +- org.apache.camel:camel-dataformat:jar:3.0.0-SNAPSHOT:compile
[INFO] |  +- org.apache.camel:camel-dataset:jar:3.0.0-SNAPSHOT:compile
[INFO] |  +- org.apache.camel:camel-direct:jar:3.0.0-SNAPSHOT:compile
[INFO] |  +- org.apache.camel:camel-directvm:jar:3.0.0-SNAPSHOT:compile
[INFO] |  +- org.apache.camel:camel-file:jar:3.0.0-SNAPSHOT:compile
[INFO] |  +- org.apache.camel:camel-language:jar:3.0.0-SNAPSHOT:compile
[INFO] |  +- org.apache.camel:camel-log:jar:3.0.0-SNAPSHOT:compile
[INFO] |  +- org.apache.camel:camel-mock:jar:3.0.0-SNAPSHOT:compile
[INFO] |  +- org.apache.camel:camel-properties:jar:3.0.0-SNAPSHOT:compile
[INFO] |  +- org.apache.camel:camel-ref:jar:3.0.0-SNAPSHOT:compile
[INFO] |  +- org.apache.camel:camel-rest:jar:3.0.0-SNAPSHOT:compile
[INFO] |  +- org.apache.camel:camel-saga:jar:3.0.0-SNAPSHOT:compile
[INFO] |  +- org.apache.camel:camel-scheduler:jar:3.0.0-SNAPSHOT:compile
[INFO] |  +- org.apache.camel:camel-seda:jar:3.0.0-SNAPSHOT:compile
[INFO] |  +- org.apache.camel:camel-stub:jar:3.0.0-SNAPSHOT:compile
[INFO] |  +- org.apache.camel:camel-timer:jar:3.0.0-SNAPSHOT:compile
[INFO] |  +- org.apache.camel:camel-validator:jar:3.0.0-SNAPSHOT:compile
[INFO] |  +- org.apache.camel:camel-vm:jar:3.0.0-SNAPSHOT:compile
[INFO] |  +- org.apache.camel:camel-xpath:jar:3.0.0-SNAPSHOT:compile
[INFO] |  +- org.apache.camel:camel-xslt:jar:3.0.0-SNAPSHOT:compile
[INFO] |  \- org.slf4j:slf4j-api:jar:1.7.25:compile

Camel 2.xでは、前述したすべてのモジュールが同じ camel-core JAR に含まれていました。

Camel 2.x から 3.0 へのマイグレーション作業内容と今後の使いやすさを考慮し、camel-core は Camel 2.x と同じ JAR 依存関係を保持します。つまり上記の出力は、camel-coreへの依存関係を宣言しただけの Maven  pom.xml もしくは gradle build ファイルから生成されたものです。

しかし Camel 3 マイルストーン 4 では、更に必要なものだけを簡単に選択できるようになります。たとえば以下の依存関係ツリーを確認することで、必要最低限の依存関係で camel-core が構成されていることがわかります。(新規に提供される下記 camel-core-engine JAR を dependency に設定します)

+- org.apache.camel:camel-core-engine:jar:3.0.0-SNAPSHOT:compile
[INFO] |  +- org.apache.camel:camel-api:jar:3.0.0-SNAPSHOT:compile
[INFO] |  |  \- org.apache.camel:camel-util:jar:3.0.0-SNAPSHOT:compile
[INFO] |  +- org.apache.camel:camel-management-api:jar:3.0.0-SNAPSHOT:compile
[INFO] |  +- org.apache.camel:camel-support:jar:3.0.0-SNAPSHOT:compile
[INFO] |  \- org.apache.camel:camel-core:jar:3.0.0-SNAPSHOT:compile
[INFO] |     +- org.apache.camel:camel-base:jar:3.0.0-SNAPSHOT:compile
[INFO] |     \- org.apache.camel:camel-properties:jar:3.0.0-SNAPSHOT:compile

この構成を説明する為に 2つのサンプルを提供しています。


前者はすべての core コンポーネントなどを含む camel-core に依存します。後者は必要最低限の依存関係を使います。この例では bean と quartz2 コンポーネントのみを使用しているので、それらを別途 依存関係として追加する必要があります。

camel-example-main-tiny の依存関係ツリーは以下のとおりです。(JAXB はテストスコープとして除外されます)

[INFO] --- maven-dependency-plugin:3.1.1:tree (default-cli) @ camel-example-main-tiny ---
[INFO] org.apache.camel.example:camel-example-main-tiny:jar:3.0.0-SNAPSHOT
[INFO] +- org.apache.camel:camel-core-engine:jar:3.0.0-SNAPSHOT:compile
[INFO] |  +- org.apache.camel:camel-api:jar:3.0.0-SNAPSHOT:compile
[INFO] |  |  \- org.apache.camel:camel-util:jar:3.0.0-SNAPSHOT:compile
[INFO] |  +- org.apache.camel:camel-management-api:jar:3.0.0-SNAPSHOT:compile
[INFO] |  +- org.apache.camel:camel-support:jar:3.0.0-SNAPSHOT:compile
[INFO] |  \- org.apache.camel:camel-core:jar:3.0.0-SNAPSHOT:compile
[INFO] |     +- org.apache.camel:camel-base:jar:3.0.0-SNAPSHOT:compile
[INFO] |     \- org.apache.camel:camel-properties:jar:3.0.0-SNAPSHOT:compile
[INFO] +- org.apache.camel:camel-main:jar:3.0.0-SNAPSHOT:compile
[INFO] +- org.apache.camel:camel-bean:jar:3.0.0-SNAPSHOT:compile
[INFO] +- org.apache.camel:camel-quartz2:jar:3.0.0-SNAPSHOT:compile
[INFO] |  +- org.quartz-scheduler:quartz:jar:2.3.1:compile
[INFO] |  |  +- com.mchange:mchange-commons-java:jar:0.2.15:compile
[INFO] |  |  \- com.zaxxer:HikariCP-java7:jar:2.4.13:compile
[INFO] |  \- com.mchange:c3p0:jar:0.9.5.4:compile
[INFO] +- com.sun.xml.bind:jaxb-core:jar:2.3.0:test
[INFO] +- com.sun.xml.bind:jaxb-impl:jar:2.3.0:test
[INFO] +- org.apache.logging.log4j:log4j-api:jar:2.11.2:runtime
[INFO] +- ch.qos.logback:logback-core:jar:1.2.3:compile
[INFO] \- ch.qos.logback:logback-classic:jar:1.2.3:compile
[INFO]    \- org.slf4j:slf4j-api:jar:1.7.25:compile

2つのサンプルそれぞれに含まれる JARの容量を比較してみました:
  • camel-example-main (camel-core): 48 JAR files with total of 9.3 MB
  • camel-example-main-tiny (camel-core-engine): 21 JAR files with total of 7.4 MB
2つのサンプルをそれぞれ実行すると、camel-core-engineを使用した方が、JVMにロードされるクラス数が若干少なくなることもわかります。
  • camel-example-main (camel-core): 3666 classes loaded
  • camel-example-main-tiny (camel-core-engine): 3430 classes loaded
目立った減少ではなかったかもしれませんが、Camel はコンポーネントを遅延ロード(lazy load)しますし、今回のサンプルは bean と quartz コンポーネントのみ使用している為、想定された結果となります。しかし、ディスクサイズが 約25% 減少し、JAR ファイルが 50% 削減されたことにより、クラスパスのスキャンスピードも多少向上するはずです。

この他にもたくさんの素晴らしい機能が Apache Camel 3 には含まれます。リリース前(2019年の 9月/10月 を予定)となる今夏、これら新機能についてブログを執筆する予定です。


2019年2月1日金曜日

[English] Check this data mapping tool! Atlasmap.io

Have you ever tried "Red Hat Fuse Online" before? It's an "integration Platform-as-a-Service (iPaaS) solution that makes it easy for business users to collaborate with integration experts and application developers".  If you've never tried it yet, please check this free trial.

https://www.redhat.com/en/technologies/jboss-middleware/fuse-online

If you know about "Red Hat Fuse Online", probably also you know that https://syndesis.io/ is the main upstream community for "Red Hat Fuse Online". How about https://www.atlasmap.io/ ?
"AtlasMap is a data mapping solution with interactive web based user interface, that simplifies configuring integrations between Java, XML, and JSON data sources." Please note that the ease of integration development is brought by AtlasMap too.

The good news is even if you are not ready for OpenShift world yet, you can still launch a standalone jar archive on your laptop to start AtlasMap web tooling. Yes, you can experience the data mapping solution within a few seconds. (Community members are still on the way to release standalone Atlasmap(issues/560), but we can try it in advance)
Of course, you can use the mapping file in your Java application. I recommend to use camel-atlasmap component because it's super easy to use.

Let me explain step by step about

  1. Download and launch Atlasmap web tooling
  2. Create data mapping
  3. Run the mapping by using Apache Camel

1: Download and launch AtlasMap web tooling

From version 1.39.0, atlasmap-standalone jar is available in maven central repository.
http://central.maven.org/maven2/io/atlasmap/atlasmap-standalone/1.39.0/atlasmap-standalone-1.39.0.jar
You can run AtlasMap standalone by `java -jar atlasmap-standalone-1.39.0.jar` which is springboot uber jar and UI is available at localhost:8585.

If you want to try latest AtlasMap source code, clone the repository and build it by yourself.
$ git clone https://github.com/atlasmap/atlasmap.git
$ cd ${ATLASMAP}
$ ./mvnw clean install -DskipTests

After booting up the web UI, you will see the console log something like this
2019-02-01 13:39:37.762  INFO 16127 --- [           main] b.c.e.u.UndertowEmbeddedServletContainer : Undertow started on port(s) 8585 (http)
2019-02-01 13:39:37.766  INFO 16127 --- [           main] io.atlasmap.standalone.Application       : Started Application in 4.816 seconds (JVM running for 5.427)
2019-02-01 13:39:37.766  INFO 16127 --- [           main] io.atlasmap.standalone.Application       : ### AtlasMap Data Mapper UI started at port: 8585 ###

2: Create data mapping

After accessing to localhost:8585, please take a look at the UI for about 5 minutes. I guess you will see what/how you can use  this tool.

On the left side panel named "Source", you can import and display the source data structure to convert.
On the right side pane named "Target", you can import and display the target data structure.

Java, XML, and JSON format is currently supported.

By moving the cursor to the arrow icon next with "Source" or "Target", you will see the pop up message "import instance or schema file".
As pop up message says, you can import xml file.(not schema file) AtlasMap will automatically analyze it for you.
Also you can import jar archive which contains multiple class files. After importing a jar archive, you can specify specific class name with package name.

By clicking each data entries from "Source" and "Target", you can do mapping.
On the right side panel named "Action", you can choose how you map data entries. (map/combine/separate)

By clicking gear icon on the right top right side corner, you can enable "Show Mapping Preview". With this feature, you can simulate the mapping using dummy data.

When you finish mapping, click export icon on the top right side to get the mapping archive.

3: Run the mapping by using Apache Camel

Using "Red Hat Developer Studio"(Eclipse) new project wizard, you can create a new sample Camel project. Please select spring boot for the run time. I select 2.21.0.fuse-720050-redhat-00001 for Red Hat Fuse version. If you love karaf container, please watch
https://github.com/atlasmap/atlasmap/issues/68.

Add camel-atlasmap dependency in the pom.xml

<dependency>
  <groupId>io.atlasmap</groupId>
  <artifactId>camel-atlasmap</artifactId>
  <version>1.40.0-SNAPSHOT</version>
</dependency>

Since 1.40.0-SNAPSHOT is not hosted on maven central repository, you need to use the one in the local maven repository.(I did mvn install with latest atlasmap git repo, so I can use 1.40.0-SNAPSHOT)

This is a sample camel route to test data mapping.
Timer consumer endpoint will fire one time. Put a sample pojo object using "sebBody", and do mapping(pojo to xml) by using camel-atlasmap. we can check the result by comparing the output log.

<?xml version="1.0" encoding="UTF-8"?>
<beans xmlns="http://www.springframework.org/schema/beans"
    xmlns:xsi="http://www.w3.org/2001/XMLSchema-instance" xsi:schemaLocation=" http://www.springframework.org/schema/beans  http://www.springframework.org/schema/beans/spring-beans.xsd  http://camel.apache.org/schema/spring  http://camel.apache.org/schema/spring/camel-spring.xsd">
    <bean class="sample.Product" id="sampleProduct">
        <property name="id">
            <value>1</value>
        </property>
        <property name="price">
            <value>1000</value>
        </property>
    </bean>
    <camelContext id="camel" xmlns="http://camel.apache.org/schema/spring">
        <route id="simple-route">
            <from id="route-timer" uri="timer:timerName?repeatCount=1"/>
            <log id="route-log1" message="hello world"/>
            <setBody id="route-setBody">
                <simple>${ref:sampleProduct}</simple>
            </setBody>
            <log id="route-log2" message="Before Mapping >>> ${body}"/>
            <to id="_to1" uri="atlas:atlasmap-mapping.adm"/>
            <log id="route-log3" message="After Mapping >>> ${body}"/>
        </route>
    </camelContext>
</beans>

This part of camel route is camel-atlasmap. atlasmap-mapping.adm file is placed under $PROJECT/src/main/resources.

<to id="_to1" uri="atlas:atlasmap-mapping.adm"/>

This is the part of output log. We can confirm that the data was converted from pojo to xml.
14:08:33.813 [main] INFO  org.mycompany.Application - Started Application in 4.41 seconds (JVM running for 4.691)
14:08:34.763 [Camel (MyCamel) thread #1 - timer://timerName] INFO  simple-route - hello world
14:08:34.768 [Camel (MyCamel) thread #1 - timer://timerName] INFO  simple-route - Before Mapping >>> sample.Product@5ed4bc
14:08:35.036 [Camel (MyCamel) thread #1 - timer://timerName] WARN  o.a.c.c.atlasmap.AtlasEndpoint - There's no source document with docId='JSONInstanceSource', returning default: docId='null', path='null'
14:08:35.037 [Camel (MyCamel) thread #1 - timer://timerName] WARN  o.a.c.c.atlasmap.AtlasEndpoint - Null or non-String source document: docId='JSONInstanceSource': docId='JSONInstanceSource', path='null'
14:08:35.037 [Camel (MyCamel) thread #1 - timer://timerName] WARN  o.a.c.c.atlasmap.AtlasEndpoint - There's no source document with docId='JSONSchemaSource', returning default: docId='null', path='null'
14:08:35.037 [Camel (MyCamel) thread #1 - timer://timerName] WARN  o.a.c.c.atlasmap.AtlasEndpoint - Null or non-String source document: docId='JSONSchemaSource': docId='JSONSchemaSource', path='null'
14:08:35.037 [Camel (MyCamel) thread #1 - timer://timerName] WARN  o.a.c.c.atlasmap.AtlasEndpoint - There's no source document with docId='XMLSchemaSource', returning default: docId='null', path='null'
14:08:35.037 [Camel (MyCamel) thread #1 - timer://timerName] WARN  o.a.c.c.atlasmap.AtlasEndpoint - Null or non-String source document: docId='XMLSchemaSource': docId='XMLSchemaSource', path='null'
14:08:35.037 [Camel (MyCamel) thread #1 - timer://timerName] WARN  o.a.c.c.atlasmap.AtlasEndpoint - There's no source document with docId='sample.Product', returning default: docId='null', path='null'
14:08:35.037 [Camel (MyCamel) thread #1 - timer://timerName] WARN  o.a.c.c.atlasmap.AtlasEndpoint - There's no source document with docId='XMLInstanceSource', returning default: docId='null', path='null'
14:08:35.037 [Camel (MyCamel) thread #1 - timer://timerName] WARN  o.a.c.c.atlasmap.AtlasEndpoint - Null or non-String source document: docId='XMLInstanceSource': docId='XMLInstanceSource', path='null'
14:08:35.037 [Camel (MyCamel) thread #1 - timer://timerName] WARN  o.a.c.c.atlasmap.AtlasEndpoint - No target document created for DataSource:[id=JSONInstanceTarget, uri=atlas:json:JSONInstanceTarget]: docId='JSONInstanceTarget', path='null'
14:08:35.037 [Camel (MyCamel) thread #1 - timer://timerName] WARN  o.a.c.c.atlasmap.AtlasEndpoint - No target document created for DataSource:[id=JSONSchemaTarget, uri=atlas:json:JSONSchemaTarget]: docId='JSONSchemaTarget', path='null'
14:08:35.039 [Camel (MyCamel) thread #1 - timer://timerName] INFO  simple-route - After Mapping >>> {JSONInstanceTarget=null, JSONSchemaTarget=null, XMLInstanceTarget=<?xml version="1.0" encoding="UTF-8" standalone="no"?>, sample=<?xml version="1.0" encoding="UTF-8" standalone="no"?><request><id>1</id><price>1000</price></request>, XMLSchemaTarget=<?xml version="1.0" encoding="UTF-8" standalone="no"?>}

For more details/instruction/latest information about AtlasMap, please visit https://www.atlasmap.io/.
I hope this post helps a bit.

Regards,
Hisao